Friday, April 3, 2009

First Model Shoot

Just did my first model shoot. What a buzz!

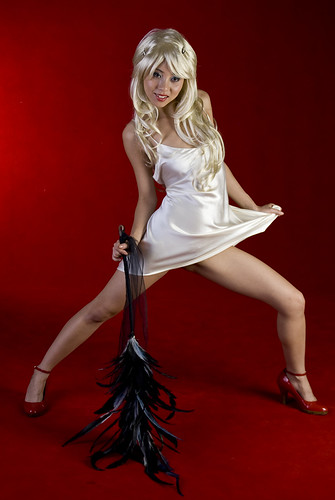
I went to a studio in Chatswood (Sydney, NSW, AUS) with 4 other photographers and 1 model. The models name was Annie Xie and she can be found @ model mayhem #848586.

It was an interesting experience, as the title suggests, I had never photographed a model before, but it was going to be a learning experience right throughout the night.

When I got there I was greeted by Dejan form Phantasee Photos. He was already aware of my limited experience and got straight into teaching me about setting up lighting and using a light meter to get exposure right.

Then Annie and the other photographers arrived. Annie was very professional, she came straight in and started on her makeup and asking us about clothes choices. She was very laid back and easy to talk to. I think she had a fair idea of what sort of photos she was after for herself. She grabbed a full length mirror and posed herself for long enough to look down the lens of all the cameras. Annie came prepared with an assortment of wigs and costumes so we never got tired of the one look.

You know, I always wondered how I would be photographing scantily clad women. In all reality, you don't have a lot of time to think about it. There's lighting, posing, clothing, lighting, background and lighting to worry about. In case you haven't worked it out, lighting plays a big part in how your photo turns out. You could have the hottest woman in the world in front of your lens, but if you can't nail that light... then it's not worth taking the shot.

So for my first model shoot, I got a decent mix of fashion, glamour, lingerie and nudity. It was great fun and very rewarding.

Here's a couple of work safe shots to show off, just a selection from over 400 :)


Tuesday, September 2, 2008

Lotus Exige HDR

Since the birth of our little girl, I've had bugger all chance to get out with my camera. I'm trying to remedy that... it's hard though, I really like being around her!

Anyway we took her to Queensland the other week and I got out a little Not so excited about the results as my timings and prior recon work were non-existent especially because I had no Idea when and where the opportunity to get out would occur.

I also bought myself a Nikon 50mm F1.8 prime lens while in Brisbane as well. Thanks to www.d-d-photographics.com. Man this thing is sharp. Noticeably better than the kit 18-55mm lens I currently have. Time for some serious upgrading.

I did, however, manage to get a serious of bracketed shots of a Lotus Exige. Again not very well planned, but better than nothing. I love HDR and this one is OK.


Only one month until I find out...

Well, I've ticked all the boxes, crossed the t's and dotted all the i's. So now I only have just over 1 month to wait for an answer.

I hope to find out just after the long weekend. Actually, I hope I don't find out before that because if it's not a good answer I'll be shitty for my entire 4 day weekend. I'm also competing in a 4wd competition that weekend, so I don't want to be cranky for that. HAHA.

Hmmm... this is a fairly short post... oh well

Friday, June 20, 2008

Light Painting

I've been playing with this cool effect, basically called light painting.

It is almost exactly as it sounds.

1. Find somewhere dark
2. Get out a torch
3. Set your camera on a tripod
4. Open the shutter to bulb (Remote helps here with stability)
5. Get around in front of your camera and shine your torch at the camera.
6. Try to draw a picture or something
7. Close your shutter.

Done!!


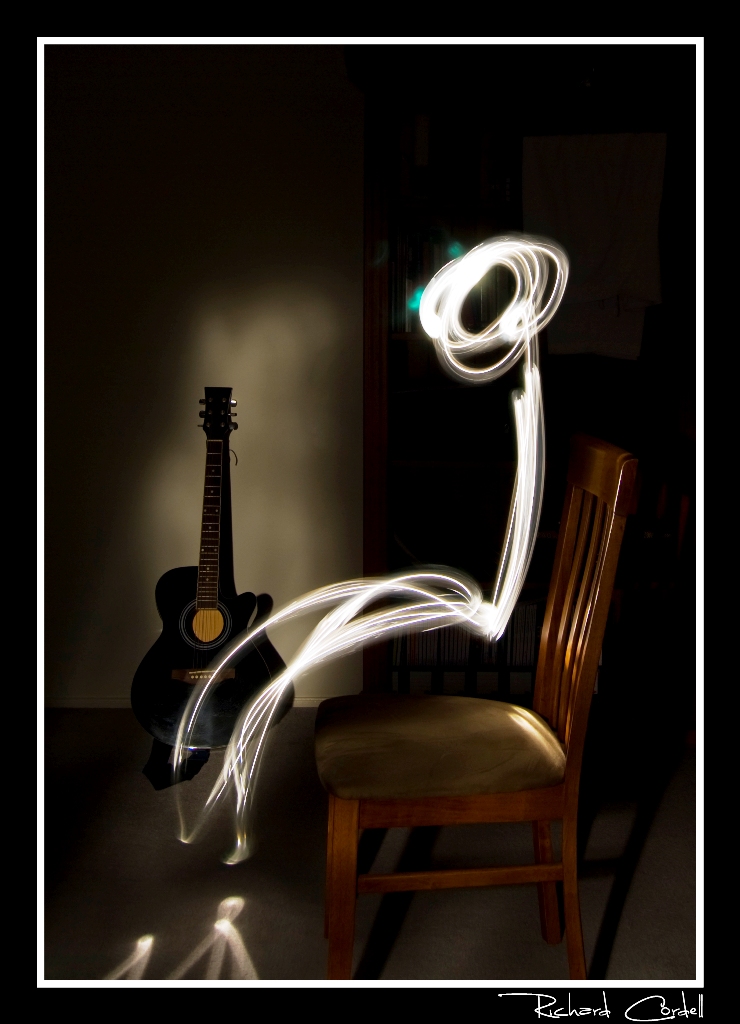
You can do some cool things with this. You can try to draw a man in certain poses, draw objects and write words (albeit backwards) to name a few. You can also use your torch to light areas of the scene up. As I have done with the chair and the guitar. I've seen this done with whole buildings and the effect can be awesome. I have heaps of ideas, now I just need the time and weather to align and I'll be set.

For this first photo, I stood on the other side of the chair and faced the camera. Then I switched on my torch and tried (poorly) to draw a man sitting in the chair. Then I went back around to the back of the camera and shone my torch on the bits I wanted to highlight. The chair and the guitar. That's it.


Wednesday, June 18, 2008

It's been a while...

WHOA...

It has been a hectic month. A week of work experience with the photographers, then I shot up to Sydney to be with my wife for the birth of our little girl, Lily Eve. Crazy.

OK, where do I start...

Ummm, alright, firstly my wife and child. Lily Eve was born on Friday the 30th of May. She has immediately and positively affected our lives. Chantelle and I were well and truly prepared for the worst, screaming all night, poo from ear to ear, no sleep... if that's the norm then we are blessed. Sure she has her moments, but all wives do... and the baby is pretty good too. It might change, but at the moment it's great.

My work experience went well, I learnt heaps. At the end I got a pretty good report too. The call for applications to transfer to photographer has come in and I had already ticked all the pre-requisites, so my application has been sent away. Now all I can do is sit and wait and hope all the pieces fall into place.

OK thats all for now, brief I know but you get that sometimes. Here's a photo of Lily I took to finish things off today.

Tuesday, May 20, 2008

Work experience - Day 2

I am learning SO much.

I'm learning heaps about the more technical aspects of photography. The mathematics behind depth of field, hyperfocal distance... far out, and I thought it was just "If I want the background out of focus, I just open up the aperture". Apparently not.

I've been shown a huge studio set up and got to sit in on a portrait shoot. I was shown and explained the lighting setup for the official naval portraits. I also got a brief tour on the area set aside for shadowless photos and for photos of small objects on a plain background. Doesn't sound exciting but I'm having a ball.

Tomorrow I'll be going out to HMAS Cresswell to start my assignment. That's to take at least 1 usable photo at an official "job" and get it from request to ready for release. Unfortunately I won't be using the Canon 1D I'll be using my own camera. And because they use Canon and I use the enemy (Nikon) I'll be probably using my own lens too. Oh well, excitement ahead either way.

HDR (High Dynamic Range)

When you point your camera at something, the camera can't always pick up the entire range of light and shadow. Or more precisely it wont pick up the detail within the light and shadow, like your eye can see. The parts that it doesn't get are either too dark (ie black) or blownout (too bright). To overcome this we can use HDR.

By taking a range of photos of different bracketed exposures you can get the detail from the shodows and from the highlights. Generally a range 1 to 2 EV steps either side of 0 will be enough. ie -2ev, -1ev, 0ev, +1ev, +2ev. This is where the Nikon D40x is letting me down. On some cameras you can set it to take a range of shots within an exposure range automatically. This is called auto bracketing. It will happen a lot quicker than taking a photo, then changing the exposure up or down a step then taking a photo...repeat. Lots can happen in that time. Clouds can move a long way, trees sway, animals &/or people will move... you get the idea.

Come on Nikon, update the D40x with auto bracketing!!!

Anyway...

Now the trick to blending these photos is up to the individual. Photoshop CS3 has an automated process found under File - Automate - Merge to HDR. I'm not sure whether earlier versions of Photoshop have this or not. I find that CS3 is too subtle for my liking so I use a program I mentioned earlier called Photomatix. There are tutorials on the net for this everywhere. I love it. One of the great things about Photomatix is being able to make a HDR style picture (though not true HDR) from a single RAW file. This is handy but the process introduces lots of noise. Sometimes it looks good, other times not. You could get rid of the noise through Photoshop &/or noise ninja (Photoshop plugin), but I'm too lazy yet. But there are literally dozens of ways to make HDR. CS3's HDR processing is alright, but Photomatix just makes the shots POP. Some people do find the Photomatix effect too much... not me. Personal taste I guess. There's an awesome tutorial on www.stuckincustoms.com. Search around there for some great HDR photos and a fantastic tutorial for Photomatix.

If you can't justify $100ish on Photomatix, fair enough. Presuming you have a version of Photoshop you can merge your photos into layers from within the document. Doing this could be a timely but satisfying experience, watching your HDR photo appear before your eyes as you erase bits of one layer to reveal the layer underneath, showing details within heavy shadows and repairing blownout sections.